During the run of the exhibition I made a number of videos to explain my thinking behind a number of my images and to also add a bit of background information from my research. The vids were also a good way for viewers not attending the physical gallery space to see the exhibition and hear my thoughts on the subject matter. By making a permanent record they also help to extend the longevity of the project once the physical exhibition closed.
Vid 1:
Target Practice Exhibition Vid 1 from ammoniteM on Vimeo.
Vid 2:
Target Practice Exhibition Vid 2 from ammoniteM on Vimeo.
Vid 3:
Target Practice Exhibition Vid 3 from ammoniteM on Vimeo.
Vid 4:
Target Practice Exhibition Vid 4 from ammoniteM on Vimeo.
Showing posts with label Assignment 4. Show all posts
Showing posts with label Assignment 4. Show all posts
Sunday, August 18, 2019

Monday, April 22, 2019
Spray Mounting Test No. 2
Yesterday I spray mounted my second test piece. This was at the larger size of 40x30 inches. It went fairly well apart from an initial panic about bubbling. Luckily I could re-lift the print and squeeze out the unwanted air pockets without too much trouble. I have to be really careful as there is a trade-off between thoroughly rubbing the surface to remove air and damaging the print surface. I've been using some acid free paper and a sponge type thing I borrowed from Gerry's art supplies. It seems to work quite well.
I am much happier with this print. The first one came out too dark. This is much closer to my smaller assessment pieces. Cutting the foam board wasn't too difficult either. I learnt a few tips along the way that will make the process much easier when I batch order the rest of the prints next month.
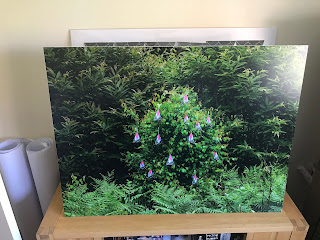
I am much happier with this print. The first one came out too dark. This is much closer to my smaller assessment pieces. Cutting the foam board wasn't too difficult either. I learnt a few tips along the way that will make the process much easier when I batch order the rest of the prints next month.

Monday, April 15, 2019
Two New Pieces
Two of the three new pieces designed for the gallery space are now finished. Like the Target Practice photographs I'm mounting them onto foam board so the gallery presentation is cohesive. Twenty sheets of A0 foam board is quite expensive! But nothing compared to the cost of framing.

The first piece I made involving the pink triangles with the bullet holes is now complete. I initially experimented with a textured surface on which to place the triangles. This resulted in the bowing of the foam board. I tried a few variations of textured paint/paste but ultimately the foam board does not appear suitable to much manipulation. It is so easily damaged.

I am satisfied with the overall result and once in the gallery space I think it will add a much needed splash of colour to the mostly green and brown landscape pieces. It also gives the viewer the opportunity to see some of the triangles close-up.
The second piece of collaged triangles was made to resemble a portrait of Josef Kohout. From the one available photograph I began experimenting with folding and manoeuvring the image to bring out the different facial characteristics in Josef's portrait.


I based the triangles in this piece on the convention of the portrait format. I toyed with the idea of placing a picture frame around the finished piece to further highlight this but decided it would look contrived. I prefer the simplicity of the shapes and the piece better fits with the rest of the exhibition on foam board and without frames.

I have just one more piece to make. I still have the mounting of the prints to do once I've ordered them from my online printer. Some plinth bases to make, A base for one of the large props and signage. Still lots to do!

The first piece I made involving the pink triangles with the bullet holes is now complete. I initially experimented with a textured surface on which to place the triangles. This resulted in the bowing of the foam board. I tried a few variations of textured paint/paste but ultimately the foam board does not appear suitable to much manipulation. It is so easily damaged.

Target Practice No.2 (working title).
I am satisfied with the overall result and once in the gallery space I think it will add a much needed splash of colour to the mostly green and brown landscape pieces. It also gives the viewer the opportunity to see some of the triangles close-up.
The second piece of collaged triangles was made to resemble a portrait of Josef Kohout. From the one available photograph I began experimenting with folding and manoeuvring the image to bring out the different facial characteristics in Josef's portrait.

Josef Kohout

Paper folding experiment No. 4
I based the triangles in this piece on the convention of the portrait format. I toyed with the idea of placing a picture frame around the finished piece to further highlight this but decided it would look contrived. I prefer the simplicity of the shapes and the piece better fits with the rest of the exhibition on foam board and without frames.

Josef Kohout (working title).
I have just one more piece to make. I still have the mounting of the prints to do once I've ordered them from my online printer. Some plinth bases to make, A base for one of the large props and signage. Still lots to do!
Saturday, April 6, 2019
Assignment 4
This post represents assignment 4 and will be presented entirely in blog format. This will enable me to pull together all the work I have done designing a flyer, the exhibition handout, making a maquette and a video of the gallery layout. In addition, by selecting the 'Assignment 4' label on this blog all preparation for the work I've done for each individual piece can be viewed together.
As mentioned I made a maquette of the Pie Factory gallery space. I then spent some time placing my images in the space and working out the layout. Here is a video I made of the current layout:
Assignment 4 SYP from ammoniteM on Vimeo.
As can be seen in the video I have made the decision to make further work to spatially reflect an exhibition in the Pie Factory location. These changes are ongoing and I hope to finalise the new work during April. One aspect of the gallery that is not seen in the maquette is the fact that only two of the rooms are white spaces. The other rooms are tiled or brick, reflecting its former commercial identity. I really like the space and I feel its visual aspect is a good fit for my body of work. Of course visualising my work against different backdrops rather than an all white setting presents further challenges.


For my exhibition flyer. I did some research of designs and decided what I did and didn't like in a design. It is important to provide all the relevant information clearly and simply. I feel I have achieved this with my design. I presented the first draft to the Level 3 student hangout group and taking their advice I made some changes - this is the final draft before my presenting to my tutor Clive White.

Here is the exhibition handout that contains the relay text for the eleven images in the Target Practice sequence. It is a very simple design printed in landscape format, slightly smaller than A4, and folded in half to present as a small card sized piece that can sit in the hand easily.


For the exhibition I've adapted my artist's statement by cutting out and condensing certain elements. I am aware that too much text on the gallery wall is off-putting to the viewer. I fully expect to re-edit this version a few times before the opening.

I've also updated my website www.michaelmcolvin.com with my Artist's Statement and bio. I will publish the flyer on the site ready for promotion once it has been cleared by my tutor.

I am currently working through my project list and April and May will be my busiest months with mounting prints, completing new work and sculptural pieces taking up most of the time. I also frequently promote my work via Facebook, Twitter and Instagram.

I have put together a Kickstarter page where I am asking for backers to contribute towards the £500 printing costs for the exhibition. Backers will receive a digital HD print of one of the pieces. I am unfamiliar with this type of promotion and I understand if the financial target is not reached then no money is received. This is why I decided to just ask for the printing costs rather than the whole exhibition cost as I thought it was a more achievable goal. Even if the target is not reached then I guess Kickstarter can still be seen as another avenue for promotion. I am waiting for admin confirmation for my profile I.D. before I can launch the campaign next week.

Edit 15th April:
Following my Zoom hangout with my tutor Clive White today the following points were discussed:
As mentioned I made a maquette of the Pie Factory gallery space. I then spent some time placing my images in the space and working out the layout. Here is a video I made of the current layout:
Assignment 4 SYP from ammoniteM on Vimeo.
As can be seen in the video I have made the decision to make further work to spatially reflect an exhibition in the Pie Factory location. These changes are ongoing and I hope to finalise the new work during April. One aspect of the gallery that is not seen in the maquette is the fact that only two of the rooms are white spaces. The other rooms are tiled or brick, reflecting its former commercial identity. I really like the space and I feel its visual aspect is a good fit for my body of work. Of course visualising my work against different backdrops rather than an all white setting presents further challenges.


Pie Factory, Margate
For my exhibition flyer. I did some research of designs and decided what I did and didn't like in a design. It is important to provide all the relevant information clearly and simply. I feel I have achieved this with my design. I presented the first draft to the Level 3 student hangout group and taking their advice I made some changes - this is the final draft before my presenting to my tutor Clive White.

Exhibition flyer
Here is the exhibition handout that contains the relay text for the eleven images in the Target Practice sequence. It is a very simple design printed in landscape format, slightly smaller than A4, and folded in half to present as a small card sized piece that can sit in the hand easily.


Exhibition handout
For the exhibition I've adapted my artist's statement by cutting out and condensing certain elements. I am aware that too much text on the gallery wall is off-putting to the viewer. I fully expect to re-edit this version a few times before the opening.

Artist's statement
I've also updated my website www.michaelmcolvin.com with my Artist's Statement and bio. I will publish the flyer on the site ready for promotion once it has been cleared by my tutor.

Artist's bio
I am currently working through my project list and April and May will be my busiest months with mounting prints, completing new work and sculptural pieces taking up most of the time. I also frequently promote my work via Facebook, Twitter and Instagram.

Trello project plan
I have put together a Kickstarter page where I am asking for backers to contribute towards the £500 printing costs for the exhibition. Backers will receive a digital HD print of one of the pieces. I am unfamiliar with this type of promotion and I understand if the financial target is not reached then no money is received. This is why I decided to just ask for the printing costs rather than the whole exhibition cost as I thought it was a more achievable goal. Even if the target is not reached then I guess Kickstarter can still be seen as another avenue for promotion. I am waiting for admin confirmation for my profile I.D. before I can launch the campaign next week.

Kickstarter campaign
Edit 15th April:
Following my Zoom hangout with my tutor Clive White today the following points were discussed:
- Flyer is approved for distribution with a small amendment made to image placement.
- Discussed timing of flyer distribution: agreed to publicise one now to allow time for people to add to diary and another as a reminder a week before event.
- Layout of exhibition discussed and I spoke about not worrying too much if some of the exhibition’s elements are not fully realised (sculptural elements). Agreed they are a bonus but not necessary to complete exhibition.
- General approval given by Clive of project management of exhibition
- Spoke about issue of pricing work and the ethics of this concerning the Holocaust subject matter. As discussed I said that I did not want to place a pricing schedule on the work but if anyone spoke to me personally about a piece I could assess if I wanted to sell.
- Check out Vistaprint for use of postcard giveaways - check budget for this.
Wednesday, March 27, 2019
Designing an Exhibition Handout
Unlike the fancy Christmas card design handout that I made for assessment of my BoW, my exhibition handout will be much simpler. This is because of the potential issue of having to make many copies for gallery viewers and the time involved in making them. I settled on a piece of landscape format A4 folded in half. To mitigate this familiar shape I will be cutting off a strip to make the folded paper feel smaller in the hand - more like a small card. The relay-text for the Target Practice images is printed in order on all sides including the front. This is purely to fit it all on and allow enough space not to crowd the text.
I had experimented with some different style of folds that would not be too time consuming to put together but this one feels like the best fit. The problem with my two earlier designs below was once the paper was unfolded the big block of text seemed off-putting to me. I probably wouldn't want to plow through it either.


This third experimental handout was folded smaller and the texts were discovered as each section was unfolded. Too fiddly and ultimately when completely unfolded the block of text issue was still there.
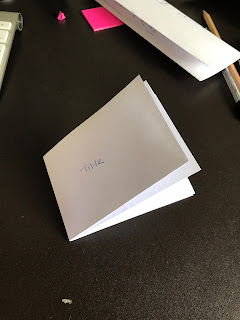
Finally, by using a landscape format the blocks of text looked a lot less chunky and crowded on the page. I may want to add more detail once I've had a chance to think about the handout for a few days but at least my main texts are all laid out.


I had experimented with some different style of folds that would not be too time consuming to put together but this one feels like the best fit. The problem with my two earlier designs below was once the paper was unfolded the big block of text seemed off-putting to me. I probably wouldn't want to plow through it either.


This third experimental handout was folded smaller and the texts were discovered as each section was unfolded. Too fiddly and ultimately when completely unfolded the block of text issue was still there.

Finally, by using a landscape format the blocks of text looked a lot less chunky and crowded on the page. I may want to add more detail once I've had a chance to think about the handout for a few days but at least my main texts are all laid out.


Monday, March 25, 2019
Gallery Layout & Making New Pieces
After making the maquette for the Pie Factory Gallery I had a play around with layouts using little pink post-it notes cut to size. After several experiments I think I've arrived at a layout that is close to how I envisaged. By exploring the maquette I made a mental note of odd-shaped areas to check when I re-visited the space. There was also the question of the mysterious fourth room. I wasn't sure I'd be using this room and needed to have another look.

When I arrived at the gallery space I was rather surprised that the online plan did not exactly match reality. A door to the toilets was not shown and this impacted on the available wall space in room two. Room four appeared larger than I remember it and I'm wondering if some changes have been made to improve the gallery space that have not been updated on the plan. There was an exhibition in progress and looking at the size of the pictures I was able to gauge the hanging space a lot better. It was a bit of shock to realise that my A1 size photographs were going to look too small! I need to go bigger! And make more work to fill the four rooms available!
Having an overnight think I decided that I need to introduce some of the props from the woodland shoots into the exhibition. I have already been encouraged to do this by the Level 3 student hangout group this week, so the decision is timely. By using the props I will better improve the visual flow through the space and not leave empty corners and short pieces of wall. The updated layout will look clean and minimalist rather than 'empty'.
I also need to make three new pieces. I will use some of the folded triangles from the woodland shoot to make two large wall hanging sculptures. The third piece will be completely new. With that in mind I began exploring with materials for making frames for the three pieces out of simple materials that will create some texture. I now have a number of new tasks to add to my project plan!


When I arrived at the gallery space I was rather surprised that the online plan did not exactly match reality. A door to the toilets was not shown and this impacted on the available wall space in room two. Room four appeared larger than I remember it and I'm wondering if some changes have been made to improve the gallery space that have not been updated on the plan. There was an exhibition in progress and looking at the size of the pictures I was able to gauge the hanging space a lot better. It was a bit of shock to realise that my A1 size photographs were going to look too small! I need to go bigger! And make more work to fill the four rooms available!
Having an overnight think I decided that I need to introduce some of the props from the woodland shoots into the exhibition. I have already been encouraged to do this by the Level 3 student hangout group this week, so the decision is timely. By using the props I will better improve the visual flow through the space and not leave empty corners and short pieces of wall. The updated layout will look clean and minimalist rather than 'empty'.
I also need to make three new pieces. I will use some of the folded triangles from the woodland shoot to make two large wall hanging sculptures. The third piece will be completely new. With that in mind I began exploring with materials for making frames for the three pieces out of simple materials that will create some texture. I now have a number of new tasks to add to my project plan!


Friday, March 22, 2019
Making a Maquette

After a futile struggle with free layout software I decided that the best way to plan my gallery layout was to make a maquette. I'd thought that the quickest and simplest way was to put something together online but hadn't taken into account the steep learning curve involved with computer design programmes. After a morning of frustration and not particularly liking the results I discussed my options with the Level 3 Student Hangout group. The consensus was "You are a model maker. Why are you not making a maquette?" Well, okay... I had considered that obviously, but thought I could save some time investigating a digital option. I needed that jolt back to reality from the group.
With help from my partner in scaling a model of the Pie Factory gallery, I managed to put together a model very quickly; in the same amount of time as failing to get to grips with the software package; and the physical output is so much more satisfying.
I now need to place my images into the maquette and work out image sizes in relation to the gallery walls and sequencing. I have also discussed the option with a number of people regarding using my props in the gallery space. I was unsure about this at first as I do not want them to distract from the images. There is also an element of interaction with the viewer which is a good thing but with such a serious subject as the Target Practice work I do not want to cross the line between interaction and entertainment. Again the consensus seems to be that I really should use the props in the show. This means taking account of their positioning in the overall layout and if they need to be modified in any way to make them suitable for the space. Lots more to think about and do!


Tuesday, March 19, 2019
Exhibition Flyer

This is version three of the flyer I designed for the Target Practice exhibition. The previous versions had larger fonts in the info section and the consensus from the L3 Hangout group was it looked a bit clunky. I also made some minor changes to the way the address was laid out, timings so the opening times and the private view didn't run into each other, all thanks to feedback from the L3 group. This flyer along with my other preparations will form part of assignment three and will be critiqued by my tutor before it is utilized in my online marketing campaign.
p.s. the dark background of this image is so that the white of the flyer does not bleed into the screen background. It is for blog purposes only.
Spray Mounting Test
This week I spray mounted one of my images onto foamboard. This method is my preferred choice for hanging the Target Practice work. It was surprisingly easy to use the aerosol which provided good coverage on the back of the image and it was really easy to handle and place. I was worried it might warp the paper or react in some way but it was ok. I also tested some D rings that were recommended by the gallery for connecting up to the hanging system. I glued them to the back of the foamboard and taped over them. Once it was all secure I hung the image in a spare room to see if it would stay smooth over time with no bubbles developing on the surface.
So far it has been a week and the image is looking pretty good.


So far it has been a week and the image is looking pretty good.


Friday, March 8, 2019
Self Promotion
I'm trying to spend some time each day on social media promoting my work and taking an interest in the work of other artists. I'm using Facebook for my personal promotion to friends and family; Instagram and Twitter is for posts to a wider audience. On these platforms I've been using hashtags to connect with like-minded individuals and surprisingly this is working out quite well in terms of fostering an online social media presence.
Now that my Pie Factory exhibition is not too far away I need to ramp up my promotion and post about some of my preparations for the exhibition to keep the interest up.


Now that my Pie Factory exhibition is not too far away I need to ramp up my promotion and post about some of my preparations for the exhibition to keep the interest up.

Facebook

Instagram

Twitter
Spraymount on Foamboard
The gallery at the Pie Factory has a hanging system installed. There are rails on the ceiling so that pictures can be hung on nylon line and attached to the ceiling rails. They have a no nails policy, so no items are permitted to be physically fixed to the gallery walls. It sounds a bit complex but I'm sure I can manage it.
My images will be A1 and I don't particularly want to have them framed. My initial idea was to tape them to the walls Wolfgang Tillman's style, but the no nails policy and not damaging the paint surface has meant I am reconsidering. I could spray mount the images to foamboard and use bulldog clips attached to the nylon line. The other option is small D rings glued to the back of the image. I need to research further...
Today as a test I have taken one of my images and spray mounted it to the foamboard. It was surprisingly easy and after an hour there are no visible signs of the paper surface bubbling. I also used some white tape to go around all four sides of the foamboard to get rid of that uneven sandwich effect that is common with this product.


Now on to Amazon or the local art supplies to find some D rings and some means of fixing them. A hanging test will be next to ensure that there will be no unforeseen problems.
My images will be A1 and I don't particularly want to have them framed. My initial idea was to tape them to the walls Wolfgang Tillman's style, but the no nails policy and not damaging the paint surface has meant I am reconsidering. I could spray mount the images to foamboard and use bulldog clips attached to the nylon line. The other option is small D rings glued to the back of the image. I need to research further...
Today as a test I have taken one of my images and spray mounted it to the foamboard. It was surprisingly easy and after an hour there are no visible signs of the paper surface bubbling. I also used some white tape to go around all four sides of the foamboard to get rid of that uneven sandwich effect that is common with this product.


Now on to Amazon or the local art supplies to find some D rings and some means of fixing them. A hanging test will be next to ensure that there will be no unforeseen problems.
Subscribe to:
Posts (Atom)